
Sunday, 22 October 2017
Tuesday, 3 October 2017
Chicken Quiche
Chicken Quiche – nothing less than the original.


Ingredients required for Chicken Quiche:
Boneless chicken – 250g (Diced into small pieces)
Eggs – 6 Nos
Mushrooms – 20g (Finely Chopped)
Cheddar Cheese – 75g (Grated)
Mozzarella Cheese – 75g (Grated)
Green Capsicum – 1 Big (Finely chopped)
Red Capsicum – 1 Big (Finely chopped)
Yellow Capsicum – 1 Big (Finely chopped)
Onion – 1 Medium (Finely chopped)
Parsley & Oregano – Dry
Chilly Flakes – Let your palette decide
Bread slices – 4 Nos with edges cut
Salt & Pepper to taste.
How to prepare Chicken Quiche:
Beat the eggs till they are nice & fluffy. Add all the ingredients to the eggs, but for a lill portion of both the cheeses to spread on top of the egg mixture. Mix until all the ingredients are well incorporated.
Chicken Quiche final prep:
Turn on the oven to preheat for 10 min at 200°C. Make sure the bottom coil is turned on.
Arrange the bread slices at the bottom of the baking pan & pour in the egg mixture. Do not use black pepper in the recipe as it would hamper the creamy yellow colour of the dish. You can use white pepper or garnish it once the dish is served. Now put in the remaining cheeses on top of the mixture. This would give you a nice cheesy crust on top.
Let the dish bake for 20-25 min at 200°C (OR) wait until the cheese starts bubbling & egg looks cooked. Then, turn on the top coil for a minute. This ensures the lovely golden brown crust on top.
Turn off the oven & let the dish rest for 5 min before you cut & serve it.
Best served with Tabasco sauce/Toasted Bread/Chilly Sauce etc
Hope you enjoy it as much as I did preparing it J
Please Note:
**Vegetarians: Chicken can very well be replaced with finely chopped mushrooms, broccoli, and zucchini at 50g each.
**I’ve used an 8*8 inch baking tray for the recipe.
Wednesday, 27 September 2017
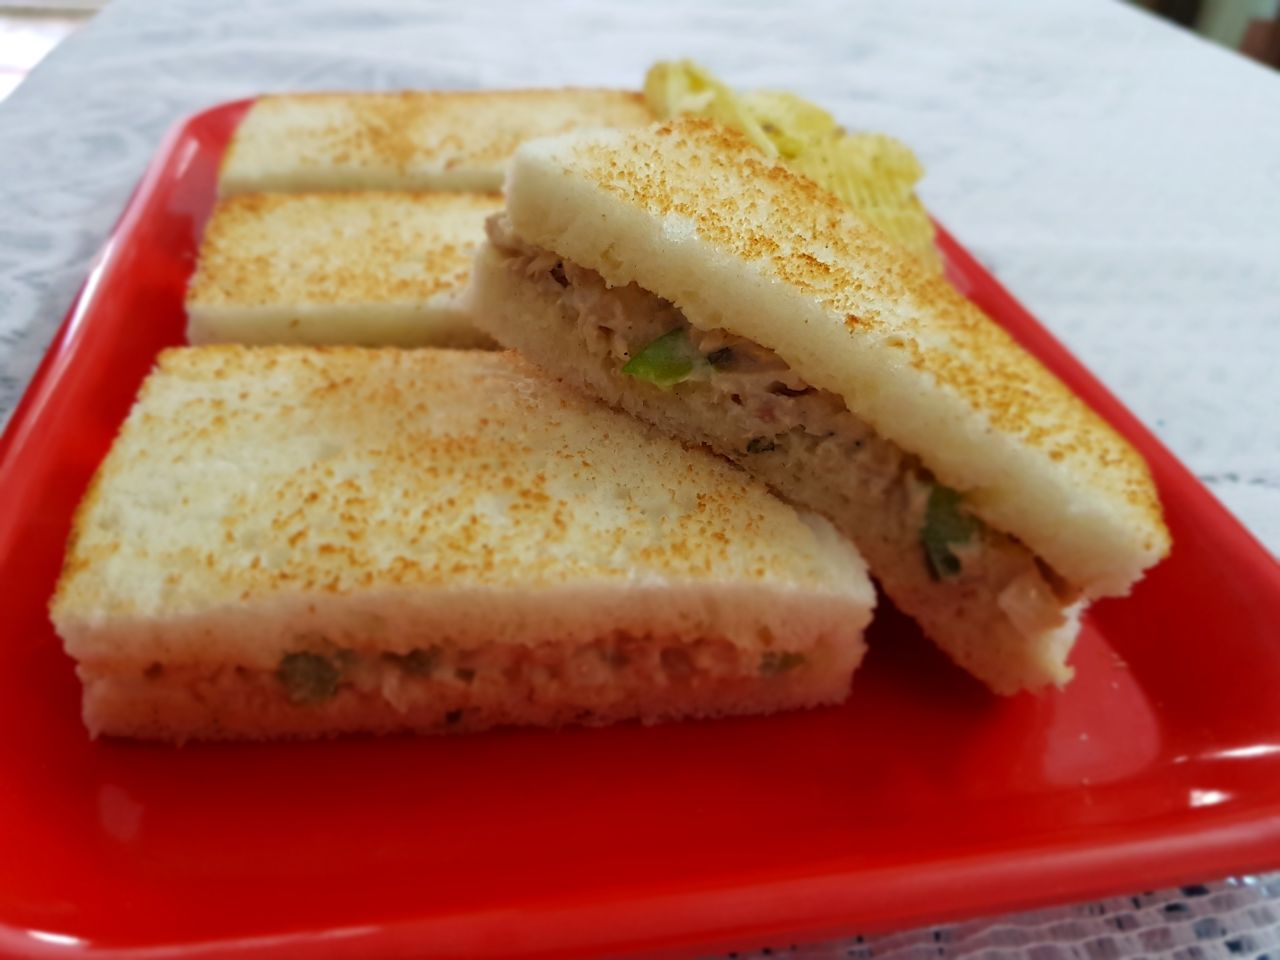
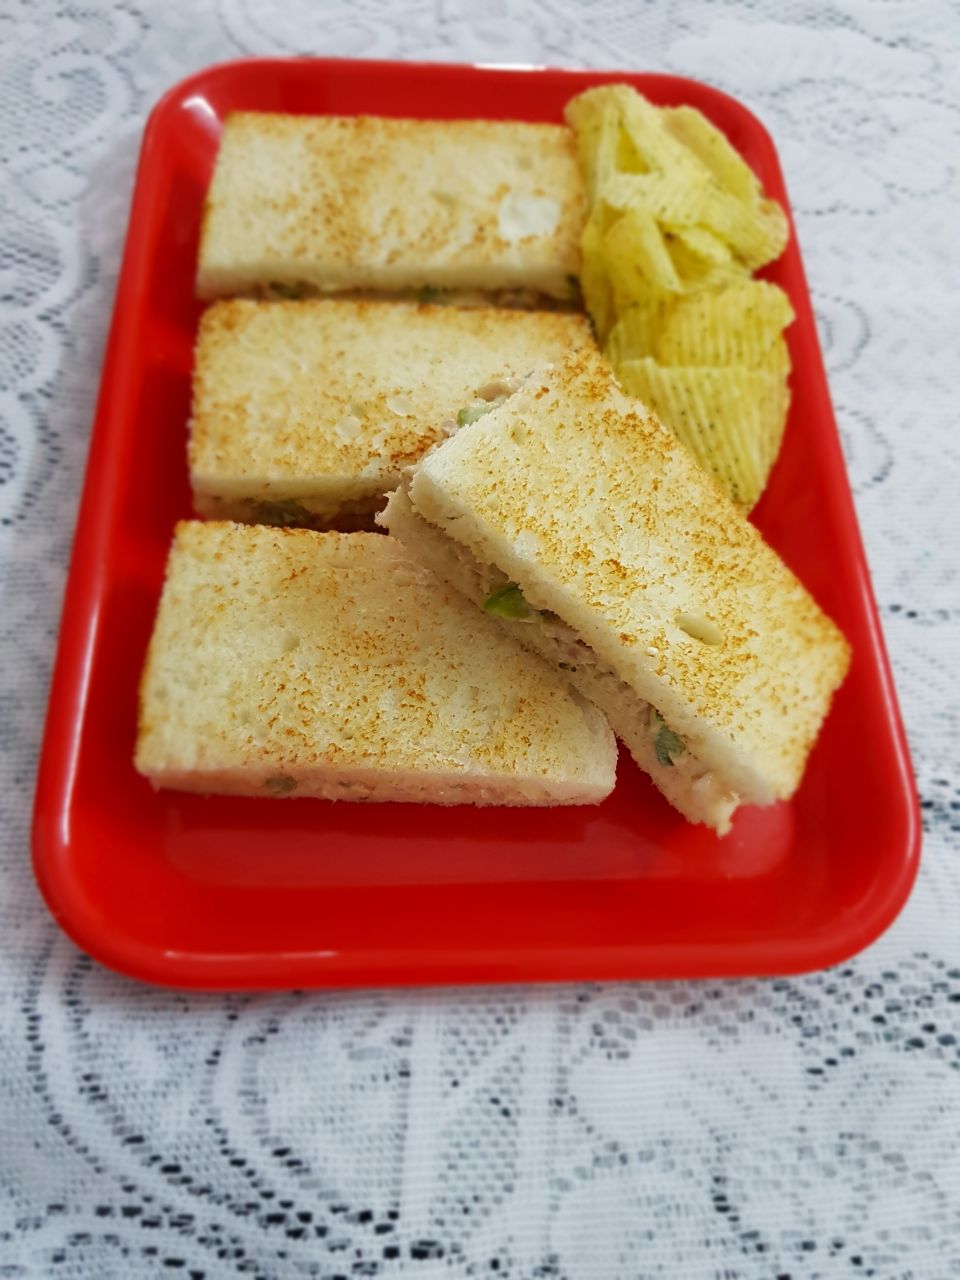
Toasted Tuna Sandwich
Toasted Tuna Sandwich – Simple yet tasty snacker.
Ingredients required for Toasted Tuna Sandwich:
Tuna – 250g (You can also use tinned fish as an option)
Bread slices – With edges cut
Capsicum – 1 Big (Finely chopped)
Onion – 1 Medium (Finely chopped)
Green Chillies – 3 Nos (Finely chopped)
Garlic Mayonnaise – 5 Tbsp
Butter – 25g
Lemon Juice – 1 Tsp
Tabasco Sauce – ½ tsp (Optional)
Parsley & oregano – Dry
Salt & Pepper to taste.
How to prepare Toasted Tuna Sandwich:
For the starters, apply slight butter on one side of each bread slice. Later, we toast them on the buttered side to the nice golden brown finish.
Tuna Filling Prep:
Wash, debone & steam the fish. Let it cool and then mash it. In case you using canned fish, empty the cans of tuna into a bowl.
Put in all the ingredients (Capsicum, onions, chillies, mayo, butter, lemon juice, Tabasco sauce, herbs, salt & pepper) and mix well.
Toasted Tuna Sandwich final prep:
Fill in the fish mixture on the non-buttered side of the slice & cover it with another and straight away to the pan on a medium heat. Let the sandwich be toasted to a fine golden brown colour on the either side. Best served with chilly garlic sauce & chips/fries.
That’s It. Simple as that for a beautiful rainy evening (or) a quick lunch box (or) a lazy weekend.
Tuesday, 2 May 2017
Goan Beef Roast
A Quick & Easy starter!

Marinade Masala for Goan Beef Roast:
Ginger Garlic Paste - 2 Tbs
Whole Peppercorns - 1 Tbs
Cloves - 1 Tsp
Cinnamon - 3-inch piece
Turmeric Powder - 2 Tsp
Cumin Seeds - 2 Tsp
Ingredients for Goan Beef Roast:
Lean Beef-1 Kg
White Vinegar - 4 Tbsp
Onion – 1 Big
Red Kashmiri Chilies – 6 Nos
Sugar - 2 -3 Tsp
Salt to Taste
Cooking Oil
Procedure:
Cure the beef by pricking the
meat with a fork.
Make a paste of all the marinade
ingredients.
Rub in this paste, along with the
vinegar & salt, & and keep it aside.
I let it rest for at least for an hour
before cooking.
In a wide pressure cooker, pour in
some oil, and once it's well heated, put in the sugar.
The sugar will start to caramelize.
Into this put in the beef. This will sear the meat & the outsides of the
meat will start getting a nice brown color.
Once the meat starts to turn brown,
put in the chopped onion & Kashmiri chillis.
Rinse the bowl in which the meat was
stored, and pour that masala water into the cooker pot.
Sprinkle a little sugar for the color
and check for salt. Shut the cooker & let it cook for about 20 minutes on
medium/high heat.
Take it off the stove & once open,
stir in the residue gravy well.
Voila! A super tasty,
lip-smacking plate of protein.
Wednesday, 26 April 2017
Deviled Eggs

Ingredients required
for Deviled Eggs:
Eggs – 10
Nos (Room Temperature)
Mayonnaise –
4 Tbsp
Dijon
Mustard – 1 ½ Tsp
Sweet Pickle
Relish – 1 Tbsp
Tabasco – 1
Tsp
Onion – 1
Tsp (Grated)
Dry Parsley –
2 Tbsp
Paprika
Salt to
taste
How to prepare Deviled Eggs:
Hard boil the eggs:
Take a saucepan and place the eggs horizontally, preferably in a
single layer. Pour in water just to immerse the eggs. Now bring the water to
full boiling. Turn off the heat but leave the pan on the hot burner & let
it sit for 10-12 minutes.
Take out the eggs after 10 minutes & pour in cold water & peel.
You will have lovely golden yolk, just right for the recipe.
Deviled Eggs Prep:
Cut the eggs into halves. Scoop out the yolks into a bowl from each egg
and set aside the egg whites. Mash the scooped yolks well. Now put in the mayo,
mustard, sweet pickle relish, tabasco, onion, parsley & salt. Give all of
them a good stir till the mixture becomes a smooth paste like. All the
ingredients are in accordance to my taste. Please get going with your
experiments too.
You can choose your own flavor of Mayo & Mustard. I’ve used garlic
mayo & classic dijon mustard.
Sweet pickle relish can be found in any hyper market. It’s basically
sweetened pickles that will have a little tang. Tabasco or you can use capsico.
Paprika can also be bought in any store or else can be replaced with red chilly
powder.
I haven’t used pepper in the recipe as it would change the colour of
the beautiful yolks. You can go ahead and use it.
And here we are, at the last step, to put the yolk mixture back into
the egg whites. I’ve used a piping bag for a proper presentation. You can as
well use a spoon to fill in the egg whites.
Garnish the eggs with parsley & paprika before serving. This dish
is best served after chilling it for a little while.
Monday, 17 April 2017
Laham Khabsah
Laham= Meat, Khabsah = Rice.It’s an Arabic preparation which
is seasoned meat flavored rice. This mildly spiced yet delicious dish would
definitely make your day.

Ingredients required
for Laham Khabsah:
Lamb Meat –
500g (Big pieces)
Long grain
rice (Basmati rice) – 11/2 Cup
Onions – 2
Cups (1 Big, finely chopped)
Tomatoes – 2
Cups (2 Big, finely chopped)
Tomato Paste
– 2 Tbsp.
Ginger
Garlic Paste – 1 Tbsp.
Green Chillies
– 2-3 Nos
Coriander Powder
(Dhaniya)– 1 Tbsp.
Cumin Powder
(Jeera) – 1 Tbsp.
Cinnamon
Sticks – 2-3 Nos
Cloves – ½ Tsp.
Cardamom
(Elaichi) – ½ Tbsp.
Pepper Cons
– ¼ Tbsp.
Fennel seeds
– ½ Tsp.
Turmeric – 1
Tbsp.
Bay Leaves –
2-3 Nos
Dried Lime –
1 (We will get it in any hyper market)
Salt
Oil
How to prepare Laham Khabsah: (Soak the
rice in water for 45 min)
Take a deep
rice pot on medium flame and heat oil in it. Then put in the cleaned mutton and
let it fry for few seconds. Then goes in the salt, onions, cloves, cinnamon,
lemon, bay leaves, cardamom, peppers cons, turmeric & fennel seeds. Give
all of it a good stir and put lid to cook for 2-3 minutes. Remove the lid and
put in the ginger-garlic paste, cumin powder, coriander powder & chillies.
Once again stir well and put the lid. This process will make the meat cook well
in spices. After 5-7 minutes, take off the lid and put the tomatoes along with
the tomato paste. Let everything cook for 2-3 minutes without the lid. Now pour
1Lt cold water. This is the time you give the dish a taste and add salt/spices etc.,
in accordance to your taste buds.
Bring the
water to boil to an extent till you find the meat to be cooked, tender and
moist. Now remove just the meat out of the pot and place it on a baking tray
lined with aluminum foil. Do not turn of the stove. Set the tray aside.
Meanwhile, put
rice in the boiling flavored water in the pot and let it cook for 20 minutes
with lid on. You can have a check on the water levels and turn of the rice once
done. Do not stir rice immediately when it’s hot as it will break the rice. Let
it cool down before you stir. This way, your rice will be flaky and non sticky.
While the
rice is being cooked, sprinkle little oil on the meat & broil it in the oven.
Jus place the tray on the middle level with bottom coil “ON”. Keep the oven at
300°C. Broil it just for 5-10 minutes. This will make the meat moist and
yummilicious to eat J
Once the
rice is cooled down a bit, garnish it with ghee fried almond flakes, pistachios
& serve it with the broiled meat.
Hope you
enjoy the dish as much as I did cooking it.:)
For orders, please mail me at violeteman@gmail.com or call me on +91-9966103993.
For orders, please mail me at violeteman@gmail.com or call me on +91-9966103993.
Tuesday, 4 April 2017
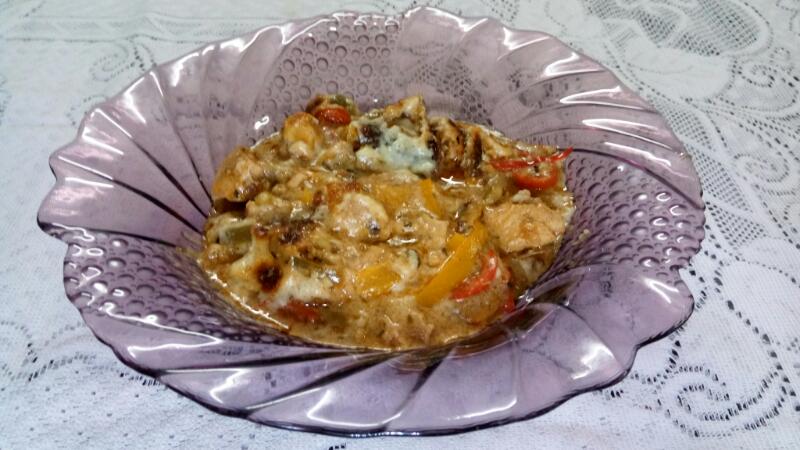
Roasted Potato & Chicken Bake
Here’s a nippy recipe of a Roasted Potato & Chicken Bake.

Ingredients for the Roasted Potato & Chicken Bake:
Chicken – ½ Kg
(Boneless)
Potatoes – 4
Big
Milk – 3
Cups
Butter – 50g
Cheese - 200 gms Grated (Pizza
Cheese/Mozzarella/Cheddar/Parmesan)
All Purpose
Flour – 3Tbsp
Bell Peppers
(Capsicum -Green, Yellow, Red) – 1 Each (Sliced into thin long strips)
Onions – 1
Big (fine Sliced)
Chilly
Powder – 2-3 Tbsp.
Tomato
Ketchup
Green Chilly
sauce
Red Chilly
Sauce
Thyme (Dry
herb)
Parsley (Dry
herb)
Olive Oil –
2-3 Tbsp.
Salt &
Pepper to taste
How to prepare yummy Roasted Potato
& Chicken Bake
** Pre-heat the oven at 350C for ten minutes.
Chicken Prep:
Clean chicken and keep it aside. Take a wide pan on medium heat. Next,
put in the sliced onions. Once the onions are golden brown, put in the chicken.
Once the chicken starts cooking, put in the chilly powder, ketchup, green &
red chilly sauces along with parsley, salt & pepper. Let your palette
decide the quantities of the sauces. Give it a good stir and let it cook for
about 5-10 minutes. There should be no water remaining by the time the chicken
gets cooked. It has to be dry yet moist, and definitely not saucy. Take it off
heat and then stir in the Capsicum. This will help in retaining the colour
& crunch of the veggie.
Meanwhile,
season the potato slices with thyme, salt & pepper and place them in the
baking tray. Need not grease the tray. Put the tray in the oven at 200°C and let
it roast for 20 min. Make sure the potatoes don’t turn brown.
Béchamel Sauce:
Place a
sauce pan on medium heat and put in the butter. Once the butter melts, put the
flour and give it a good stir. Make sure the flour does not burn but at the
same time leaves its raw smell. Now goes in the milk slowly with continuous
stirring. Season the milk with salt & pepper and stir continuously till it
thickens. The consistency should be of a soup.
Layering the Bake:
By now the
potatoes should be roasted well. Sprinkle little cheese on potatoes. The next
layer is the chicken and then on top goes the béchamel sauce, again topped with
cheese.
Let it bake
for 15-20 minutes at 180°C with the bottom coil and then 5 min with the top
coil.
Take it out
of the oven & let it rest for 10 minutes before you serve.
Best
accompanied with toasted garlic bread.
Hope you
enjoy this dish as much as I did J
For orders,
please mail me at violeteman@gmail.com
Monday, 27 February 2017
Chicken Lasagna
It is normally made with Beef/Mutton. But Chicken being
widely accepted, I’ve tried a Chicken Lasagna and trust me, it’s divine!


Ingredients required
for chicken lasagna:
Bechamel Sauce:
Butter – 60g
Flour – 40g
Milk – 500ml
Nutmeg
Powder – ½ Tsp
Salt &
Pepper to taste
Chicken Prep:
Olive Oil –
5-6 Tbsp
Onions – 1 Large
(Finely Chopped)
Celery – 2
Sticks (Finely Chopped)
Garlic – 4-5
Cloves (Finely Chopped)
Chicken
(minced) – 500g
Tomato Paste
– 1/4th Cup
Tomato Puree
– 800g
Sugar – 3 Tsp
Fresh Basil
Leaves – 10-12 Leaves (Finely Chopped)
Oregano – 1
Tbsp
Paprika/Chilly
flakes – 1-2 Tbsp (To your taste)
Salt &
pepper to taste
Lasagna Assembling:
Lasagna
Sheets – 500g
Cheese
(Grated) – 400g (I’ve used a combination of Milk, Cheddar & Mozzarella
cheese)
Options for
cheese – Parmesan/Cheddar/Mozzarella
Bread Crumbs
How to prepare bechamel sauce for chicken
lasagna:
Take a nonstick
sauce pan on low heat and put butter to melt. Then stir in the flour. Make sure
there are no lumps. Once the raw smell of flour is gone, pour in the milk.
Continuous whisking is required to avoid lumps or milk from getting burnt. Now
add the nutmeg powder, salt & pepper and let it simmer to a thick
consistency. The consistency should be similar that of Alfredo sauce (white
sauce). Once done, set it aside.
Chicken Prep:
Take a wide
pan on medium heat with olive oil. Once hot, put in the finely chopped onions
and let them get to golden brown. Now put in the celery & garlic and give
it a good stir. Next goes in, the chicken. Stir it and let it cook for a minute
or two before you pour in the tomato paste along with the puree. Let all the
ingredients cook for 2-3 minutes. Once you see the puree bubbling, put in the
sugar, oregano, basil leaves & paprika. A good stir once again. Add salt
& pepper to taste.
You decide spice
levels of the dish.
More paprika
= More heat.
Chicken Lasagna assembling: (Pre-heat oven
at 180°C)
Take a
baking tray and grease it, either with butter or greasing spray. Now, the layering
of Lasagna is totally to your liking/interest. I have layered it the following
way,
Layer 1: Lasagna sheets – Bechamel
Sauce (to cover the sheets completely) – Cheese
Layer 2: Lasagna sheets – Chicken –
Bechamel Sauce (Very little)
Layer 3: Lasagna sheets – Chicken
Layer 4: Lasagna sheets – Bechamel
Sauce – Cheese – Bread Crumbs
Baking Process:
Pre-heat the
oven at 180°C for 5-10 min, while you assemble the chicken lasagna tray. Now
cover the tray with aluminum foil, and bake for 35-40 min, with the bottom coil
of the oven turned on. Remove the foil and bake for another 25-30 min. Poke in
a knife/toothpick to check if the bottom most layer is cooked or no. It will be
hard to pierce, if uncooked.
Now turn off
the bottom coil & turn on the top coil for 5 min till you see the crust
bubbling and golden brown.
Take it out
of the oven and let it rest for 10 minutes before you serve.
Slightly
lengthy procedure, but it is totally worth it!
**If you are
as patient as me, to have piping hot
food, bake it just an hour before you eat & on the other hand,
**If you hate to wait for your food, bake this much
earlier before you eat & leave it in “Warm” mode in the oven.
Either way,
you are rest assured; it’ll be deliciously lip-smacking JJ
Wednesday, 22 February 2017
Chocolate Mousse
CREAMY CHOCOLATE MOUSSE – the perfect ending to a meal.


Ingredients required
for chocolate mousse:
Milk Chocolate
(Compound) – 500g
Butter – 90g
Whipped
cream – 200g
Egg white -
4
Egg yolk
(Yellow) - 2
How to prepare chocolate mousse:
Melt the chocolate & butter in a glass bowl, microwave
preferably for about 2-3 minutes on low, and stir till it gets to a smooth liquid
consistency (Use a larger bowl, as you’ll have to mix all the other ingredients
into the chocolate+butter mixture). In another bowl take the whipped cream and
whip it further, till you see the fluffy stiff peaks forming. Set it aside. In
bowl No.3 whip the egg whites till the thick peaks form again.
Now into the
chocolate mixture, put the egg yolks & stir slightly. Next, fold in the whipped egg white in small
portions. Make sure you fold the
mixture and not stir it. Profuse stirring will result in a dense textured
mousse and not light and creamy.
After the egg white, fold in the
whipped cream in the same manner. Make sure all the ingredients incorporate well
into a creamy mixture.
And that’s
it, the process is done. Simple isn’t it?
All you have
to do now is pour it in a serving tray, place it in the fridge & wait n
wait n wait till it sets properly.
Garnish (Optional)
You can
garnish the mousse with choco-chips/choco-rice/grated chocolate/colorful
sprinkles/chocolate truffle etc.
How
to make chocolate truffle for garnish:
Melt a small
chunk of dark chocolate and pour warm milk in it. Continuous stirring required.
As soon as you pour milk, it forms into a lump. Continue stirring as it loosens
up into a thick liquid. The thickness depends on your liking. More milk, more
liquid consistency.
Recommended
– Let it be little thick as it gets easy to garnish.
Once you put
mousse in the fridge for setting, wait for 10-15 min and then pour the truffle
on it and put it back in the fridge. This will avoid mousse and truffle mixing
up.
Enjoy your creamy chocolaty mousse!
Subscribe to:
Comments (Atom)